Assets in UiPath Orchestrator and their usage in project
Assets usually represent shared variables or credentials that can be used in different automation projects.
In Assets, you can store specific information so that the robots can easily access it.
Benefits of using assets in your automation project:
- It provides an extra level of security.
- All credentials stored here are encrypted with the AES 256 algorithm.
- While designing a process, we can use assets because their values can be hidden from the developer or anyone who is building the process.
Different types of Assets we can use:
There are four types as mentioned below:
- Text- Store only strings.
- Bool- Supports true or false values.
- Integer- Stores only whole numbers.
- Credential- Contains usernames and passwords.
Now we get to know what is asset and it’s usage.
Let’s jump into the practical implementation of creating these assets in the UiPath Orchestrator.
Step1: Go to your orchestrator or you can click here to go there and then it will ask you for the login provide the registered mail id.
Step2: After you login there you can see a screen like below and there you can find the assets option inside your automation folder.

Here I have two folders as shown in the above image keep a note that we will discuss that in a moment.
Step3: After clicking on an asset in step 2 and it will appear as below where you can add a new asset as shown below:

Before creating an asset we have two different options when we click on add assets as shown above:
Firstly, let’s discuss those two different options before creating an asset.
Create new asset:
Here we can create a asset and it’s usage is same as mentioned above.
Link from other folders:
As the name suggests here we are not creating any asset but we are linking an asset that is already created in a different folder to the new folder where your robot is available for automation.
Creating an asset:
Step1: Click on create new asset which is shown in above image.
Step2: Now we need to create our asset as shown below:
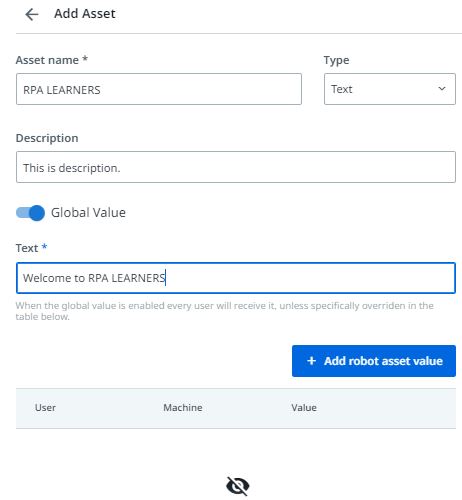
- Asset Name- Provide the appropriate name that you are using in your automation.
- Type- You can select the required type from the four different types mentioned above.
- Description- Provide the description if needed(optional).
- Global Value- This is the main point here as you don’t want everyone to access your asset value then you can set the robot asset value by turning off the global value option.
What this will do is that it only provide those asset value to that particular robot while executing the process.
- Text- Asset value which we want to provide to robot.
Now let’s see how to add robot asset values instead of global values:

Step1: Turn off the global value option as shown above.
Step2: Click on add robot asset value in the image as shown above.
Here the parameters to be filled are below:
- User- Add the automation users that are created in your tenant to provide the asset access.
- Machine- Select the machine name where you want to use this asset value.
- Text- Provide the asset value.
Note: If you want to add a robot asset value make sure you add at least one asset value.
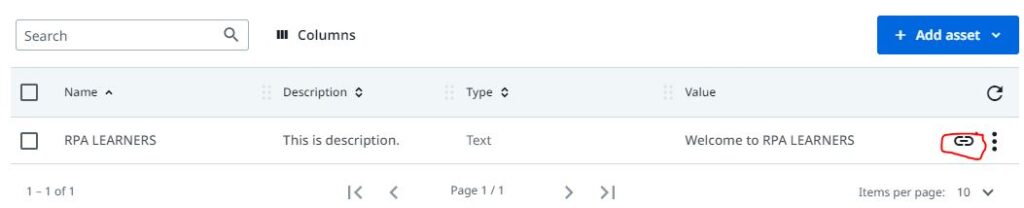
Step3: Click on add and then click on create it will create the asset as shown below:

Now let’s talk about the link from other folders option here:
We have an asset created in the RPALEARNERS folder but now I need the same asset value to the shared folder as well.
Will you create another asset?
Now by using this option we can link already created asset to this folder.
Let’s see how we can link the created asset to another folder:
Step1: Go to the shared folder and click on a link from the other folders option as shown below:

After clicking on that you will be redirected to the below screen where you need to select the folder from where you want to select the asset from as shown below:

Select the required folder and click on continue where you will land on the final page where you link the asset in that folder as shown below:

Finally, click on Link and it is successfully linked the RPALEARNERS folder asset to the Shared folder.
The linked asset looks like below and then you can find an asset linked from another folder or not by seeing the highlighted area which is shown below:
This is all about assets in the UiPath orchestrator and creating and linking assets in the UiPath orchestrator to different folders.
Hi, this is a great blog and I always enjoy the information posted here! Thanks againl